Saturday, September 12, 2015

Exploring HTML5 API for Enriched Web App Development & Experience

Few days back,somehow i noticed chrome browser way of handling and enhancing the API for web similar to the Apps that run on devices.Such as prompting for Notifications,locations,Vibrations,Offline Storage and even more API and making it more interesting to develop apps for Web and Web based mobile apps.So,skimming and getting deep into the API's using Javascript and enhancing the user experience and Developer experience.Using it Appropriately at right place at right time will really be gain on both sides.This tutorial will help you to get to know and learn about more powerful Javascript API.

Exploring HTML5 API for Enriched Web App Development & Experience

Reference : Demo | Download

Prerequisites :

  • HTML5 based web browser.(probably Chrome,which i love it more.)
  • few considerable skill to work on Javascript.
  • little patience to work with code.

Procedure :

we'll try to work on few API such as Notification API,Location API,Offline Storage API and with Server Sent Events.

Notification API : 

Notification plays vital part in showing new information received to the corresponding service and showing to the end users.you would have experienced this when you get an email notification when you work in desktop and getting chat notifications while working with other tabs.
function notify() {
   if (!("Notification" in window)) {
     alert("This browser does not support desktop notification");
   } else if (Notification.permission === "granted") {
     var notification = new Notification("Hi there!");
   } else if (Notification.permission !== 'denied') {
     Notification.requestPermission(function(permission) {
       if (permission === "granted") {
        var notification = new Notification("Shiva has Messaged You!");
       }
     });
   }
}
from the above snippet we have written as function for notification handling,in which it requires users permission to send notification,So we are just requesting the user for the Permission as soon as user gives away the permission and callback function is invoked for making further actions.Note that always check for the permission before sending the notification and send only legit/reasonable notification because it may irritate users on seeing more notifications.And perform a check over the browser supports notification API in advance as initialization and perform the other related tasks.

Location API :

Location is another aspect for developers to choose languages,localtime or even advertisements and stats of the website may be useful for future purpose(Business decisions) and knowing about the website users geolocation.
function shareLocation() {
   var output = document.getElementById("out");
   if (!navigator.geolocation) {
     output.innerHTML = "<p>Geolocation is not supported by your browser</p>";
     return;
   }

   function success(position) {
     var latitude = position.coords.latitude;
     var longitude = position.coords.longitude;

     output.innerHTML = '<p>Latitude is ' + latitude + '° <br>Longitude is ' + longitude + '°</p>';

     var img = new Image();
     img.src = "https://maps.googleapis.com/maps/api/staticmap?center=" + latitude + "," + longitude + "&zoom=13&size=700x250&sensor=false";

     output.appendChild(img);
   };

   function error() {
     output.innerHTML = "Unable to retrieve your location";
   };

   output.innerHTML = "<p>Locating…</p>";

   navigator.geolocation.getCurrentPosition(success, error);
 }
And in the above code we just requested the browser for the current location on and browser and probable(Chrome) explicitly asks for permission to share the info to the particular site.here as an callback success we have got latitude and longitude ,with those using the Google Maps API service call we just bought the map into the document(The locations may be vary since it is based on your ip.(if you're a broadband user you may get a correct location where as such as 2G and 3G service you may get the Server location
(As far i had seen).

Offline Storage API :

With this powerful API in HTML5 we could easily use the database on front end client side and making the load time and process time easier on server side.For example,When you look like application facebook,G+ posts can be saved locally in database (offline storage) and can be updated when they are connected to the network next time.this will really increase the loading time and rendering time minimum.instead of  requesting the server for the whole newsfeed contents.

IndexedDB - Offline Database 

This support storing object,create,update and delete like relational Database and have a look at it here.

LocalStorage : 

Before HTML5 there was a big story behind this,have a read.So we are in the age of good developed and matured API.
function localstore() {
   if (typeof(Storage) !== "undefined") {
     // Code for localStorage/sessionStorage.
     localStorage.setItem("name", "Shivasurya");
     localStorage.setItem("company", "i-visionblog");
     alert("saved the values");
   } else {
     alert("Your Browser Doesnt Support Storage Feature");
   }
 }

 function retrieveStore() {
   alert(localStorage.getItem("company"));
   } 
So from the above code you can utilize the localstorage as key pair value and retrieved using the key from the storage.this is mostly used among the web developers,However try to use the indexed DB for complex apps and solve a loading time and increasing the productivity.

Live Demo : 


function notify() {
   if (!("Notification" in window)) {
     alert("This browser does not support desktop notification");
   } else if (Notification.permission === "granted") {
     var notification = new Notification("Hi there!");
   } else if (Notification.permission !== 'denied') {
     Notification.requestPermission(function(permission) {
       if (permission === "granted") {
         var notification = new Notification("Shiva has Messaged You!");
       }
     });
   }

 }

 function shareLocation() {
   var output = document.getElementById("out");
   if (!navigator.geolocation) {
     output.innerHTML = "<p>Geolocation is not supported by your browser</p>";
     return;
   }

   function success(position) {
     var latitude = position.coords.latitude;
     var longitude = position.coords.longitude;

     output.innerHTML = '<p>Latitude is ' + latitude + '° <br>Longitude is ' + longitude + '°</p>';

     var img = new Image();
     img.src = "https://maps.googleapis.com/maps/api/staticmap?center=" + latitude + "," + longitude + "&zoom=13&size=700x250&sensor=false";

     output.appendChild(img);
   };

   function error() {
     output.innerHTML = "Unable to retrieve your location";
   };

   output.innerHTML = "<p>Locating…</p>";

   navigator.geolocation.getCurrentPosition(success, error);
 }

 function localstore() {
   if (typeof(Storage) !== "undefined") {
     // Code for localStorage/sessionStorage.
     localStorage.setItem("name", "Shivasurya");
     localStorage.setItem("company", "i-visionblog");
     alert("saved the values");
   } else {
     // Sorry! No Web Storage support..
     alert("Your Browser Doesnt Support Storage Feature");
   }
 }

 function retrieveStore() {
   alert(localStorage.getItem("company"));
 }

See the Pen HTML5 API - i-visionblog by s.shivasurya (@shivasurya) on CodePen.

Final note :

And thus we have seen few rich set API which can be used at appropriate need in web apps and enhance the user experience.However always check for support of the API on load itself and then invoke calls and respect the users behavior always and forcing them for permission and locking them this will be creating bad impressions.

And there are still lot in HTML5 API such as detecting online/offline status,Canvas 2D drawing,animation,vibration API,full screen API,Audio & videos and WebRTC api for live webcam access and peer-to-peer communications.

for Hugs/bugs/errors/enhancements just comment below or drop me a mail to [email protected] or chat with me in G+/facebook/Quora and do follow me in twitter/newsletter for regular updates.Share is care.

Sunday, August 23, 2015

Working with Instamojo Payment Integration For Websites And Mobile Apps

Few week back was working with a company for a premium project for Hybrid mobile app development and came across a wonderful service named as instamojo payment service/gateway for selling service/physical goods/events and tickets and even more.we used this service for adding credit amount to the Hybrid mobile apps.And the service charge is too nominal fee i hope since i got paid Sample Rs.100 and the service charge was around Rs.2.And it was awesome to talk with the developers of instamojo since it is a startup company.


Reference :    


Prerequisites :

  • A Valid website or Mobile App to Integrate.
  • Fully Activated Instamojo Account.
     You should submit your Bank statement and PAN card for verification and Phone number to prove that you're a legitimate user.
  • Developer keys private/Oauth key and Hash Secret.
  • Little patience to set up everything around :)

procedure:

We will see about initiating the Payment from our site along with the Web Hook request as well API service from Instamojo.Additional to this we will see how to implement the HMAC-SHA1 Integrity check for Safer transactions and protecting the user data over Network.

Initial Setup :

Create Instamojo Account here.And verify KYC by submitting your Bank Account Passbook photo snap and PAN Card with few more documents as instructed by instamojo.com.And get verified and it allows you to create links for new payment where you can sell your service or products over online.

After the approval process :

Create new Link for payment :

Instamojo Provides excellent features such as Events,Physical goods,service and membership plans and even more.with this they offer to index the link in search engine and they do SEO for the links you have created.

Follow the steps to create your own links: have a look at it.


So,from the Above Example snaps you can create your own service.The only thing here may be new is WebHook url,it is just a POST request made by the instamojo server to our server after every successful transactions made by the users.so that we could update our database faster and provide service to the user who have paid without any delay.

Note : The Above Screenshots are just for depiction and may Contain Fake Data and you need to create it with correct information inorder to ensure payment goes correctly.
Dont share your WebHook URL in public may be someone can try making Bruteforce attacks by making POST request and attack your DATABASE.never reveal your Private/Ouath and Hash keys.

Setup Payment in Web or App :

Here you can setup two types of Payment integration within the site either by prefiling the user information and proceed to payment or just redirecting the user to Gateway where he fills the info and process the payment.

hereby we will see the just redirection to the Payment gateway and user fills the Payment information at the Processing time.Prefilling the form contains HMAC-SHA1 verification and verifying the integrity check of the transfered information over network.We will see this in Next Post.


Select Dashboard > Corresponding link > payment Button will show you this form and can customize it.
Note : if you want to remove powered by instamojo you need to pay them some credits in their market place seems.

paste the code in our web app or mobile app.Coming to the mobile app(HTML5 hybrid apps) just you have to do the transaction in in-app browsers and writing listeners function for url change you could detect the success of the payment and return back to your app.[for further clarification drop me a Mail or Hire me to set up payment gateway in Mobile Apps].

Handling Webhooks :

Most important part of this application is handling webhooks from Instamojo server with Integrity check of source and data for updating our payment database.

<?php
$filename = "/tmp/webhook_data.txt";
foreach($_POST as $key => $value)
{
    file_put_contents($filename, "$key: $value\n", FILE_APPEND);
}
file_put_contents($filename, "----------\n", FILE_APPEND);
?>


The above code will just receive the payment data from the instamojo server when they try to post in our URL.it can be viewed when opening this file.This is really a bad approach of saving users data in flat file and we should check the REQUEST was made actually from INSTAMOJO server by checking Hash sum  calculation using our private key provided by instamojo.

A clear understanding : 


first of all instamojo with the users data they combine all data in alphabetical of the keys taking their values and adding '|' as concatenation and therefore combining all them as Strings.They calculate the hash with your private hash key.(You can get it here) and append it to the post request as sign as key and value as hash.

After reaching our server,for most step is to check for SQL injection attacks,Scan all POST variables and filter all variables.Then retrieve all key pair values from the request part.once again concatenate all the Values with '|' except the Sign part and recalculate the HMAC-SHA1 hash.

Compare both hash and if it is true,the request from instamojo server is legitimate one and you can trust the data and save it in your business Database.

I have implemented this in Node.js - HMAC-SHA1 verification - if you're interested drop me mail to get samples.

Note : Calculate the Hash as prescribed by the Instamojo( get the Complete guide here) or else it may lead to false value and ignoring valid customer data sometimes and lead to dual work and overhead.

Always try with all testcases in Development mode before moving to Production mode of app because,payment gateway can cause many troubles.Read more error codes from Instamojo website for better understanding.

Final Word :

Test all possible testcase in development mode itself and hadle all security checks in development mode and try with all testcase in webhooks,even a single loop hole can cause danger to your Customer data and business logics.

Thus instamojo made our life easy by integrating payments more simplified with pay with links as motto.my next post will be completely how to add custom data,prefilled form,HMAC-SHA1 check sum calculation for web and mobile apps.

for bugs/errors/hugs/comments/help/projects just drop me a mail to [email protected].or chat with me in G+ / Fb chat.Share is care.do comments. 

Wednesday, June 10, 2015

Facebook API Javascript SDK - A Complete Reference for Websites,Apps

Recently i was spending my time on Quora,Instagram and Good reads,pinterest in my free time, and the Most common feature i was seeing through the three Apps was Facebook Integration deeper and they were utilizing the Facebook API to the core and increasing the Traffic,Socializing their apps in successful manner.I have made the title as Complete reference since,Utilizing proceeding API calls we could successfully socialize and integrate apps efficiently with facebook and drive more social traffic.
Rather than the Company Advertising,When Friend suggest you via App,that will be really true and awesome to check it out and which drives more user Engagements to your app.

Facebook API provides excellent API service to integrate with Their friends and share the apps from likes to custom Stories via your app.So lets come up and use the API effectively and deeply link your service and make the users to socialize and drive social traffic to your web app without much Efforts.

Facebook API Javascript SDK - A Complete Reference for Websites


Prerequisites :

You Should have Valid Facebook Developer account to create apps and performing tasks and little javascript knowledge and data sharing knowledge to integrate with your site.

Scope :

After Working out from this Post you can Integrate Facebook API such as Like,Comments,Photo upload,Links Sharing and custom stories from your site and increase your Social traffic and engagement of users.

How Does it work ? 

Generally Facebook API is normal Web service (RESTful) where resource are accessed via URLs.Each method/functions has separate url to access with Access tokens with privacy/permissions from users and Oauth Authentications.

Procedure :

  1. Create App in facebook with corresponding Name.
  2. Fill out all the forms corresponding for web pages(since web app)
  3. Get your APP_ID and Secret KEY for the APP.
  4. Add your contact email address and App namespace and Domain of the APP.

Initialize Your APP with Facebook JS SDK : 

Facebook provides Javascript library so that you can perform the API calls with authentication and check the status of Facebook login/logout and even more Event Listeners for task to be performed after liking/Commenting/sharing.
  <script>
      window.fbAsyncInit = function() {
        FB.init({
          appId      : 'YOUR APP ID HERE',
          xfbml      : true,
          version    : 'v2.3'
        });
      };

      (function(d, s, id){
         var js, fjs = d.getElementsByTagName(s)[0];
         if (d.getElementById(id)) {return;}
         js = d.createElement(s); js.id = id;
         js.src = "//connect.facebook.net/en_US/sdk.js";
         fjs.parentNode.insertBefore(js, fjs);
       }(document, 'script', 'facebook-jssdk'));
    </script>

Determine the User Logged in/out :

Invoking this Javascript piece of code will determine that whether the user is loggined or not and with the help of Javascript Callbacks we could determine the next action to be performed.on invoking this function you just get response object as json,so that you can know the current status of the person.

FB.getLoginStatus(function(response) {
  if (response.status === 'connected') {
    var uid = response.authResponse.userID;
    var accessToken = response.authResponse.accessToken;
  } else if (response.status === 'not_authorized') {
    FB.login();
  } else {
    FB.login();
  }
 });
so,With the help of above function we could authenticate the valid user to the app.

Login using FB with permissions :

So,Invoke Login when user hits a button or Facebook too gave inbuild html tag for login Button.So just pass the permissions as parameters.
FB.login(function(response) {
  if (response.status === 'connected') {
    console.log("Thanks for login and you can perform");
     testAPI();
  } else if (response.status === 'not_authorized') {
      console.log("you can't use our app unless you just login");
  } else {
  }
});
Getting User Public Profile Data :

inorder to get user info and save it in our Database just invoke FB.api method and response would be as JSON object as well in callback you can do server side calls with javascript.
FB.api('/me', function(response) {
    console.log(JSON.stringify(response));
   transferToMyServercall(response);
});

Facebook Share Dialogs and Callback Events :

I love the most in javascript is Callbacks,and when the user likes or comments or share something via facebook we could detect the valid clicks and use it in marketing and promotions in our site.
FB.ui({
  method: 'share',
  href: 'https://developers.facebook.com/docs/',
}, function(response){
  console.log("THANKS FOR SHARING! 90 CREDITS ADDED TO YOUR ACCOUNT");
});

Facebook Send Button :

Sending app invites,sharing links directly via app to fb as personalized messages to your friends.
However this makes more interesting, This is same as Pinterest to invite other users to join with you on pinterest,with personalized message to your friends as well as group message.

Note : unfortunately We dont have response object since it may be privacy part of user to share personalized message,However i dont know the actual reason behind it.(if so comment below)

Facebook Feed Sharing Dialog :

FB.ui({
  method: 'feed',
  link: 'http://www.i-visionblog.com',
  caption: 'An example caption',
}, function(response){});
This kind of share dialog box can be used in both ways,

  • Sharing the info in your wall - via app.
  • Sharing to friends timeline directly by passing the options as from,to,picture,caption etc.have a look at complete option list here.
The response would be post id after sharing in wall or feed successfully.

Note : Once again if your friend chooses privacy as only she/he could post on his/her timeline,then there would be an Exception and be ready to handle.

Add Friend dialog - Friend Request :

Bad!luck, this is completely removed above API 2.0 version.

Event Subscription :

One of the most likable feature is event subscription,which will make our app to respond to likes,comments,share as callbacks.this would be better for writing general application logics.
For example: 
When a User at Quora shares answer via Social Network the answer writer receives Points based on sharing,So here
onsharing event occured and as callback the answer writer gets point updated in Database.(However that's just example)


<div 
  class="fb-send" 
  data-href="http://url.to.your.page/page.html"
  data-colorscheme="dark">
</div>

// In your onload method
FB.Event.subscribe('message.send', message_send_callback);

// In your JavaScript
var message_send_callback = function(url) {
  console.log("hey You get more points,thanks for sharing");
  console.log(url);
}
The same way once after subscribed,we could also unsubscribe the events that occurs.

So,with these components and API,we could develop and promote our Data driven Web applications/games and bring back more traffic to our site/App.

For hugs/bugs/suggestions/help/projects,just drop me a mail to [email protected] or chat with me in Facebook/G+ chat.follow me in twitter,linkedin for updates.Share is care.Do comments.

Saturday, April 25, 2015

App Invites For Android & iOS Apps - Facebook Friends To Mobile App

Recently I got a Notification from my Close friend in Facebook suggesting me to try a Android App.I too Eagerly clicked over that and installed from Google Play.
And the next day i was asking her how did you invite me via Facebook ? or just spammy Notification just like another Candy Crush Saga :D.Then she shown this page to me App-invites - Facebook Developers page.I was Wondering how could i invite From My App(Android) and checked out the Documentation  About the App invites and it was Quite confusing first,however after lot of Searching over Stackoverflow,reading the Documentation thrice i could build a Simple Invite System from My Android App to Invite and Suggest the App in Facebook to Engage to Download or to open the app.

App Invites For Android & iOS Apps -  Facebook Friends To Mobile App

Refernce : Download Code from GitHub 

A Drift from Web App to Mobile App : 

Once Upon a time i could remember working with implementing the invite system with Javascript with Facebook,and Now i consider this is as a Major Drift Change from web app to Mobile apps replacing it.This invite system can increase the User engagement to the user at higher levels,since you're personally inviting your friend,sweetheart :D to try those Apps.

Prerequisites : 

Here we're developing a Simple Android App that has invite button and directs to invite popup and invite our friends in facebook.
  • Android Studio With Recent SDK installed (Preferable for Dependency Adding).
  • Facebook Developer Account.
  • Register A Facebook App with Key Hash and Package Name.
  • Android Phone with facebook App Logined
  • Little patience to Debug the App via logcat.
  • A little Knowledge About Developing Android Apps and Java.
Before Writing this post,I have created a small App which made me many troubles such as App crashing,Low speed internet Connectivity(My Fate :D ) and Some Exceptions.here i will completely write my experience and exception and how i handled them.If anything apart from this let's discuss in Comments or over Email.

Creating Facebook Application - Developer console :

here we can discuss about creating Facebook App and obtaining APP ID and Secret keys for our app,and providing platform as Android,Adding key hash and package name.

  • visit here and Create new App - Link - Facebook Developers Console.
  • select the Platform As Android > and provide a Name for Your app corresponding to your android app.
  • Choose a Best category that fits your App(Most recommended by facebook to Rank your app).
  • Provide the package name to facebook and Launcher Activity too as java package name.(be cautious about package name or else it wont works :D)
  • Provide your necessary app info and move on to key hashes(will see it later how to add it)
  • At the top right of the Page click skip the Quick start and you will be redirected to App dashboard which you have created.
  • go to app > settings > provide a namespace for your app(mandatory)
  • Add contact email also and save it.
  • Now,at below add platform > select Web app and give your website address(if it available)
  • if you have website and added the platform then,Add your domain in Domain Field and Save the info.(Don't worry if you don't have any websites just skip to next step)
  • Get your APP ID and make your App live for production in status & review > toggle the button to enter in to Production mode.
  • And finally We need to Add Key hashes to our Facebook App console.(see below)

How to Generate Key Hash and Add to Developer Console :

just with your onCreate method add this code and replace with your package name correctly and run your app in Debug method(by Default it would be) and check your Logcat for the keyHash : XXXXXXXXXXXXX. Just copy it and visit your app in facebook Developer Account > Settings > in the Android Section (Which you have already created with package name) in the key Hash Field add it over and enable single-signon(may be useful for apps with login) and save the app settings.

Note : this is preferable method which i have created the key added to my Account.
@Override
public void onCreate(Bundle savedInstanceState) {
    super.onCreate(savedInstanceState);

    // Add code to print out the key hash
    try {
        PackageInfo info = getPackageManager().getPackageInfo(
                "REPLACE WITH YOUR PACKAGE NAME HERE", 
                PackageManager.GET_SIGNATURES);
        for (Signature signature : info.signatures) {
            MessageDigest md = MessageDigest.getInstance("SHA");
            md.update(signature.toByteArray());
            Log.d("KeyHash:", Base64.encodeToString(md.digest(), Base64.DEFAULT));
            }
    } catch (NameNotFoundException e) {

    } catch (NoSuchAlgorithmException e) {

    }

Android Studio Project and Facebook SDK Setup :

I just love Android Studio mainly because it automatically adds the dependency with one line in app gradle.However i'm not expert in Working of Gradle system! however i know how to use it projects to add dependency without any pain unlike Eclipse you have to Add it and point the locations and export while you're building it finally.
  • Open You Android Studio(i hope you have installed latest SDK and tools installed).
  • create new project with a Empty Blank Activity.
Now just open your app gradle file and add the entries to resolve the dependencies via maven repository.

dependencies {
    compile fileTree(dir: 'libs', include: ['*.jar'])
    compile 'com.facebook.android:facebook-android-sdk:4.0.0'
}
 and just sync your gradle or rebuild your project.

Note : Mainly this Dependency support from API 9 and above.just change minSDK as 9 and higher till Android API 22 or L (your choice).

Adding the Code : 

lets just first see about setting permissions and adding entries in Manifest file regarding Facebook SDK setup.
  • I have added a default activity to be launched and shown in launcher.
  • then added facebook activity (may be useful for apps used for login/share with facebook)
  • added meta-data content containing facebook app id as string from xml file.
    don't just hardcode your APP ID, it may create exceptions,it is recommended by facebook to use as String from xml string.
  • Finally add Permission for internet appropriately since we are doing network based operation in our app and facebook needs it. 
        

    <uses-permission android:name="android.permission.INTERNET" />
<application ...>
<activity
            android:name=".facebook"
            android:icon="@mipmap/ic_launcher"
            android:label="@string/title_activity_facebook" >

            <intent-filter>
                <action android:name="android.intent.action.MAIN" />

                <category android:name="android.intent.category.LAUNCHER" />
                <action android:name="android.intent.action.VIEW" />
                <category android:name="android.intent.category.DEFAULT" />
                <category android:name="android.intent.category.BROWSABLE" />
               
            </intent-filter>


        </activity>
        <activity android:name="com.facebook.FacebookActivity"
            android:configChanges=
                "keyboard|keyboardHidden|screenLayout|screenSize|orientation"
            android:theme="@android:style/Theme.Translucent.NoTitleBar"
            android:label="@string/app_name" />

        <meta-data android:name="com.facebook.sdk.ApplicationId" 
  android:value="@string/facebook_app_id"/>
    </application>

So just use this example to add your manifest file,and check that you have added facebook activity in your manifest file too.

MainActivity - Activity to initiate App invites :

Here we are initializing the App with facebook library and set the view as XML layout and then simply add a link and preview image preferably a large image is recommended.
get your App links from facebook to launch the activity from facebook or web or some other apps.learn more about app links here in my previous article.
create App link from here
  • select the created facebook app for android
  • Select android platform and scroll down
  • in the Android section , Add your package name for launching the app if it is present in the particular device or else just as fallback it may be moving into playstore.
  • Enter your playstore package name(must be equivalent to your android app project package name)
  • If you have website just add it,check that you have app links in the head section of the website and the domain should be already added in the App> settings > domain(when web platform is enabled )
  • Create a new Applink and just copy it.
Just replace with your app link in the code given below,and chenge your imageurl too(must be high resolution image).
 
@Override
    protected void onCreate(Bundle savedInstanceState) {
        super.onCreate(savedInstanceState);

            FacebookSdk.sdkInitialize(getApplicationContext());

            setContentView(R.layout.activity_facebook);
            
String appLinkUrl, previewImageUrl;

            appLinkUrl = "https://fb.me/493857950766025";
            previewImageUrl = "http://2.bp.blogspot.com/-99shOruuadw/VQsG2T233sI/AAAAAAAAEi0/noFTxUBh_rg/s1600/appscripts.png";

                AppInviteContent content = new AppInviteContent.Builder()
                        .setApplinkUrl(appLinkUrl)
                        .setPreviewImageUrl(previewImageUrl)
                        .build();
                AppInviteDialog.show(this, content);

        }
Thus while Opening your app this will default invoke to app invite activity of facebook.
Here facebook verifies the user has installed however latest facebook app in device or else as fallback it opens as webview facebook.You must be logined in the facebook Native app or Webview already will be fine for testing.

Main Note:

This Invite Feature doesnt need any Login With Facebook Feature,This just Simply enables you to invite your friends when you're logined with facebook app.

Errors which i came across:

  • null pointer Exception for not Adding Facebook App ID in manifest file.
  • null pointer Exception for Hardcoding the APP ID in manifest File.
  • Facebook App canvas Error for not adding key hash mismatch.
  • Facebook App canvas Error for App in development mode(switch to Production mode)
  • Null pointer Exception for not initializing Facebook SDK before setcontentView method.
However if you didnt find any error if you come across,comment below lets discuss it and resolve and make this post more usable.

My Screenshot : 


For hugs/bugs/errors/help/suggestions just comment below or mail me to [email protected] or chat with me in Facebook/G+ or tweet me in twitter.Share is care.

Friday, March 20, 2015

Getting Started With Google App Scripts - Send Email From Google Spreadsheets

In This Modern World it would be better to have triggers to do our works automatically with less input feed and make more automated manner.and Recently,This was running in my head and concurrently i'm one of the member of Google Student club in my College and we were about to conduct a small workshop and one of the member took in-charge of getting online forms filled and select 30 students and sending them a confirmation mail to them and instruction.and it was successfully implemented in native hand written scripts in PHP and MYSQL.And there comes my idea of using Google App Scripts with Triggers in Action to Automate our Selection panel and E-mail Sending to who have registered.and suddenly gone through DOCS and tried with my mail and was sending mails in minutes from spreadsheet and thought of sharing it my followers,and recently i got request to write Google Apps scripts tutorial.

This is just Kick Start for Google App Scripts @ +i-visionblog !You can expect more business and Productivity based app scripts soon in our blog or personally contact me in mail for Other Apps Scripts for Business and Productivity.


Reference : Demo | Download Script

Motive :

Our Goal in this post is to send Email to the peoples who have submitted the form or recorded response and as well as Admin.The mail will be delivered from your mail inbox to the client through Gmail API.

Prerequisites :

  • A Google Account with Google Drive Enabled.
  • A Little knowledge in JavaScript to handle Arrays and functions.
  • Google Forms and Spreadsheet.
And little patient to test and Debug the code and check the log for error handling! 

Procedure :

Setup up A Basic Form with Google Forms.
    • Open the link create Simple Form with Name and Email as TEXT attribute and make it as mandatory by ticking required.
    • Then publish the form public and test whether it is working and accepting the form submission over public.
select Script Editor
Setting up Basic Script for sending the Mail with Script editor in Spreadsheet :
  • Go to the corresponding the Response Form Spreadsheet and open and view in Browser.
  • under Tools > Script Editor select it and will open the new tab with Google scripts page.
  • create new blank Project in Google App Script Editor.
  • And then with default code.gs file will be prompting you to type the code.
  • So,it's time now to write down the code for Responding the user with the mail who submitted the form with our function written in Google App Script Editor.

 Code : 

 function onFormSubmit(e) {

  var timestamp = e.values[0];
  var mailaddress = e.values[2];
  var body = e.values[1];
  MailApp.sendEmail(mailaddress,"TEST MAIL",body);

  }


The Above Code is self explanatory one ! however you could get the the response from the e variable as array e.values and with MailApp.sendEmail function you could send the email by passing the parameters as mail address ,Subject and body.note that always the first array value will be timestamp of submission and next will be your form values in according your arrangement in Google Form.

Steps to Execute :

Follow the steps correctly to test and execute the script.

select current project trigger

  • Click Current Trigger Project in Google App Script page Toolbar.
  • You will be listed with Triggers with corresponding functions written in code.gs,it must be mapped with corresponding events like spreadsheet on view,edit,update and adding entries and form submissions.
  • set up trigger 

    • Click on Notification > and change it to immediately for crash Reports 
    change to immediately to check your errors

    • Click Okay and in main Project Trigger confirm your identity by accepting the OAuth from google for delivering the mails on your behalf and with your name.
    • Now view the live form and test it in your browser and if all goes well just you will be getting mail who submitted the form with correct mail id.
    • If you need admin Email also just copy the same function and replace with your email hardcoded so that you may also get mail whenever the form is submitted.
    • If something you(Admin) will receive the script Failure Exception details via Email update immediately since we set immediately in our notification of current project triggers.

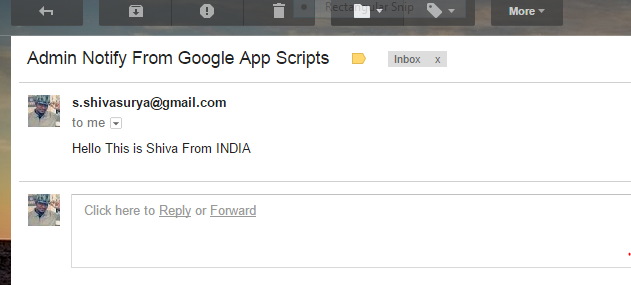
    My Result on Testing the Google Form :

    Test Mail successfully Received

    thus have a live Demo from above given link in reference section and download the code and try yourself.Always validate the input from the client! side for improving the security.

    Note: This post deals with the basic of Google App Script usage.You can do a lot with Google App Scripts almost you can Automate all your activities.Let us see about it in future post.subscribe our blog for updates and recent posts.

    For Bugs/Hugs/comments/doubts/updates and projects just drop mail to [email protected] or chat with me in Facebook/Google+ chat and for updates and interesting tweets/updates follow me in Twitter.
    Share is care.Feel free to comment

    Sunday, February 22, 2015

    App Indexing API For Google Search - Mobile Application Development

    Mobile Computing and Mobile Application Development is the Future,made me to think that Mobile apps and computing,optimization is going to be the next big thing on Earth.As i have experienced Android development as well As Web Development i could correlate the things like Google Search, Mobile Views and so on.As every one knew Mobile apps search are comparatively different from Desktop search,Where we could directly visit the Websites and make purchase and move on.But, in the case of Mobile it is going to be however hurting experience for both users and Developers to maintain and interact with Webview in Smartphones.So,Google came up with Solution to show and index apps on Google search on Signed in Browser for Android and show relevant apps that can be view with Mobile apps.

    So,if it is site we could submit the sitemaps to Google Bots and Crawl our contents for indexing,but in case of apps... so,here comes Indexing API to index your app contents and correlate the contents with web and mobile and Show suggestions on Google Mobile Search app.


    Prerequisites :  

       Download : Code at GitHub 

    We are just going to Create some content in app and try to show in Google Suggestion using Relevant Keywords.We will deal without web url in this post.
    • Android Phone with Play Account
    • Android Studio (Preferable because of Gradles )
    • Some Patience :D and Simple App to test it out.

    Procedure :

    As i don't write android app tuts here,Just Start Creating Simple App with main activity with some contents and title with relevant key title.You can refer the Source code from my Github Repo.There are two ways of App indexing as i have categorized with Web URL and Without Web URL.
    • With Web URL we could index the content of the app in Google Mobile Browser Search by showing your App and which will lead to open the App from native browser.
    • Without Web URL we could index the content of the app in Google Search Suggestion in Google Search App which leads to open the content of the apps.(BTW the search result display is not mentioned as far as i have read). 

    Configure Your APP :

    Just we have to configure your app manifest to accept the intents and make way to launch your app by other apps and receive data.Important thing in app indexing is having correct App URI and Keywords.Your app uri must be kind of,

    android-app://com.example.app/<scheme>/<host>

    However you can use your own custom scheme,Follow the given code below for example,


           <meta-data android:name="com.google.android.gms.version" android:value="@integer/google_play_services_version" />
            <activity
                android:name=".MainActivity"
                android:label="@string/app_name" >
                <intent-filter>

                    <action android:name="android.intent.action.VIEW" />
                    <category android:name="android.intent.category.DEFAULT" />
                    <category android:name="android.intent.category.BROWSABLE" />

                    <data android:scheme="cricket"
                        android:pathPrefix="/sachin" />

                </intent-filter>
            </activity>

    Test your app using adb command :

    adb shell am start -a android.intent.action.VIEW -d "cricket://sachin" com.ivb.app.app_indexing
    This must start the activity successfully without the errors! check out the code for manifest here.

    Without Web URL : 

    First of all let us assume that we have website with content and displaying in Google search results and we need to link that with our Android app.

    There are two steps to set up this App indexing API :
    1. First implement the API in the Android application with few lines of code,Check out the simple Activity title to be indexed here.

    Setting up Google API client :


    public class MainActivity extends ActionBarActivity {
        GoogleApiClient mClient;

        @Override
        protected void onCreate(Bundle savedInstanceState) {
            super.onCreate(savedInstanceState);
            setContentView(R.layout.activity_main);
        mClient = new       GoogleApiClient.Builder(this).addApi(AppIndex.APP_INDEX_API).build();


    using onStart method make your API call after loading your UI generally,make your web URL as null,since we don't deal with the with Web indexing now.we will deal with with web url in next post.


    public void onStart(){
            super.onStart();

                mClient.connect();

                final String TITLE = "sachin tendulkar masterblaster";
                final Uri APP_URI = 
      Uri.parse("android-app://app.ivb.com.app_indexing/cricket/sachin");

                final Uri WEB_URL = null;

                PendingResult<Status> result = AppIndex.AppIndexApi.view(mClient, this,
                        APP_URI, TITLE, WEB_URL, null);

                result.setResultCallback(new ResultCallback<Status>() {
                    @Override
                    public void onResult(Status status) {
                        if (status.isSuccess()) {
                            Log.d("success", "App Indexing API: Recorded recipe view successfully.");
                        } else {
                            Log.e("error", "App Indexing API: There was an error"
                                    + status.toString());
                        }
                    }
                });

        }

    Using onStop() method and disconnect the Client of GoogleAPI service


    public void onStop(){
            super.onStop();

                final Uri APP_URI = 
    Uri.parse("android-app://app.ivb.com.app_indexing/crciket/sachin");

                PendingResult<Status> result = AppIndex.AppIndexApi.viewEnd(mClient, this, APP_URI);

                result.setResultCallback(new ResultCallback<Status>() {
                    @Override
                    public void onResult(Status status) {
                        if (status.isSuccess()) {
                            Log.d("success", "App Indexing API: Recorded recipeview end successfully.");
                        } else {
                            Log.e("error", "App Indexing API: There was an error"
                                    + status.toString());
                        }
                    }
                });

                mClient.disconnect();


        }


    Use this API calls wherever you want and you can make it dynamic for same activity by passing relevant uri and keywords.And main important thing here is giving Relevant Keywords for your Activity and content to be indexed in Google search and suggestion.

    Note: After implementing this you can check your Google Search using Google Now/Search app Showing suggestion when you search relevant to your keywords.

    My Results : Code hosted on GitHub


    Well we had seen how to index our app content with keywords and APP-URI through APP-INDEXING API.However before implementing this API,Just test it the App-uri using adb tool and check whether it is resolved successfully and opening your app.

    Lets implement with WEB url in next post with live App with search result indexing

    For Suggestions/Help/hug/bug or projects just drop me a mail to [email protected] or chat with me in Facebook/Google+ hangout or connect with me in Twitter for recent updates.Share is care and sign up for newsletter for recent updates in blog.