V6 SUPERCHARGER FOR ANDROID:
The V6 Supercharger script can
be safely run on all Android phones; be it stock ROMs or third-party ROMs. It
has presently been tested with Android Gingerbread and the effect will purely
depend on the type of phone specs (GPU type, CPU speed and RAM capacity) and
definitely on the kernel type. It will also depend on the amount of TSR
(terminate and stay resident) apps such as alarms, live wallpapers, etc, that
you may have installed which cause additional memory strain. Those using
ICS-based ROMs can also try the similar method, but the script will be
different.

Requirements:
·
The V6 Supercharger Script Update 8
or higher (from the XDA forums)
·
Scrip Manager app (free from the
Android Market)
·
BusyBox version v1.18.2 or lower
(free from the Android Market)
·
A rooted Android phone.
Begin by rooting your phone if you haven’t already done so. You can find
the procedure to do so for your Android handset on the XDA forums.
Those who have phones from unbranded Chinese manufacturers might find it
difficult to get them rooted. Next, download and install BusyBox Installer and
choose the ‘v1.18.2’ or lower from the dropdown list and install it. Next,
install Script Manager from the Android market. Make sure you have BusyBox
v1.18.2 or lower, unless specified that the higher version can be used safely.
Now get on your phone and run the app ‘Script Manager’. Allow
root access and make sure you click on the ‘Browse as root’ and then on ‘OK’.
The next screen will open the built-in file browser to locate the script. Click
on the update 8 supercharger script that you earlier saved on your SD card’s
root folder. And you will reach the next screen. Here make sure you click on
the ‘SU’ button (the one with the skull and bones) and then click on the ‘Run’
button
. Now wait and be patient while the commands in the script are
being executed. Read every line carefully so you know what it is doing. You
will be asked for your inputs at particular points and you can do so by
touching the screen anywhere in the center to bring up the onscreen keyboard.

The first time it will ask you to define the scrolling speed—you can
choose normal or fast according to your preference. We chose fast (1).
You will see a number of lines scrolling giving you information. You will also
see a screen with around 17 to 30 options (depending on the script update
version 8 or 9 you are using) from which the script will ask you to enter your
choice. Enter the value ‘9’ as the optimum value for your phone. If your phone
has RAM lower than 512 MB, you should choose 7 or 8. This will start the
optimization of the operating system. In between you will come across some
lines that state that the phone is 0% supercharged and a few other lines
stating the current and increased OOM values.

You can optionally choose to
run the script every time you boot the handset to ensure you have the
supercharger script doing its work in the background and you have a smoother
handling experience. To do this, all you need to do is run the Script Manager,
choose the Supercharger Script (the file will be named as 99SuperCharger.sh)
from the ‘/data’ folder and select the option to run as root and run at boot
before running the script again. This option will enable the operating system
to include the supercharger script at every boot.

MOVING SYSTEM APPS TO SD CARD:
1: Downloading
and Using Android’s ‘adb’
Given the fact that a simple tweak like
this should be doable with nothing other than the mobile device itself, it’s
unfortunate that software must be downloaded to get the job done. On the pside, nothing has to be installed; on the
downside, the download weighs in at ~450MB.Download the android sdk and extract
the platform-tools folder to your desktop.
2: Setting Up Your
Phone or Tablet
The options that need to be configured
to prepare your phone or tablet could vary from device to device, so bear that
in mind. Almost always, the ‘USB debugging’ option in the Developer options
menu will need to be checked off; if no Developer menu is present, go to the
“About device” option in the main system menu and tap on the device’s “Build
number” option 7 times.
 With the software and phone prepped,
it’s time to open up a Windows command prompt and travel to the folder where
‘adb’ can be found; this location is wherever you A) extracted our special
download to; B) extracted the official Android SDK download to or C) installed
the platform-tools to using the official Android SDK manager.
With the software and phone prepped,
it’s time to open up a Windows command prompt and travel to the folder where
‘adb’ can be found; this location is wherever you A) extracted our special
download to; B) extracted the official Android SDK download to or C) installed
the platform-tools to using the official Android SDK manager.
NOTE: If after
plugging in your phone, it’s not picked up by Windows, you might need to
install some drivers.
Using the above download I have
extracted the folder to desktop.The path is
C:\Users\Elcot\Desktop\platform-tools
Once you’ve established where the ‘adb’
executable is, you can navigate to its location using the ‘cd’ tool. Using the
first location mentioned above, moving to the folder would require this
command:
cd
“C:\Users\Rob\Desktop\platform-tools\”
Quotes are not needed around the
filepath unless one of the folder names has a space in it.
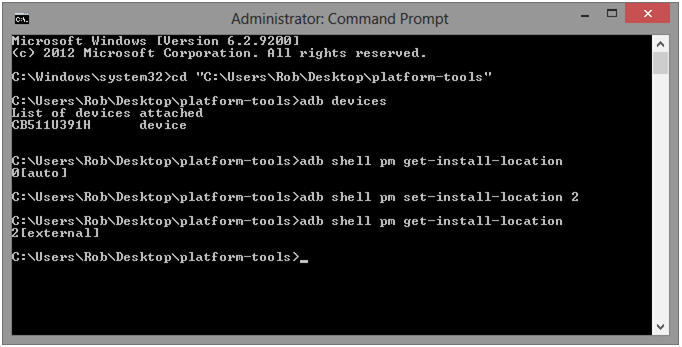
Run the following commands:
1:”adb devices”
2:adb shell pm
getInstallLocation (Android <4.0)
3:adb shell pm get-install-location (Android 4.x)
This results in a numerical value to state where the default install location is (0: phone, 2: external).
This results in a numerical value to state where the default install location is (0: phone, 2: external).
4:adb shell pm setInstallLocation 2 (Android <4.0)
adb shell pm set-install-location 2 (Android 4.x)
This sets the default install location to the external storage.
adb shell pm set-install-location 2 (Android 4.x)
This sets the default install location to the external storage.
Once the last
command is set, you can run the ‘get-install-location’ command again to verify
that it took effect. If so, then you can unplug your phone and get on with
moving some apps.
low is an example of an app that isn’t
able to be moved to external storage without this tweak. On the left, the
device was left as it was; on the right, the tweak above was applied. As you
can see, the tweak lit up the “Move to SD card” option.


INSTALLING CUSTOM ROMS ON ANDROID PHONE:
To Flash a ROM for your
Android device you first need to meet the following prerequisites:
2.
A custom ROM that was developed
or ported for your device.
3.
A MicroSD Card to hold the ROM
file temporarily.
ROM
Flashing
1.
Obtain a ROM of your choice, many
can be found in your devices development forum on XDA Forums or a alternate
android development site.
2.
Once you have downloaded the ROM
File, mount your phones SD card and and copy over the .zip file.
3.
Power off the device and then
boot up to recovery, it is different per device. If you are unsure how to boot
up to your Android device's recovery menu then look it up in the forums or
other tutorials on your device.
4.
In your phone's custom recovery bootloader,
locate the menu options which allow you to wipe the phone. Whenever changing
roms it is a good idea to make a Nandroid or BART backupfirst, then wipe
Data/Factory and Dalvik-Cache before flashing the new rom.
5.
Once your phone has been wiped go
back up to the root of the menu and select 'Flash Zip from SD Card' the text
may be different per Recovery.
6.
Locate the ROM .Zip file you wish
to flash.
7.
Confirm the flash by following
the on-screen instructions (ie: pressing the trackball, pressing the call
button, etc.)
8.
If no errors arise during the
flashing process then the ROM flash was successful, Reboot the device.
RUU
Flashing
1.
Connect your Android device to
your computer. Most ROM
Upgrade Utilities (RUUs)
are .exe files which will only run in Microsoft Windows natively or in
Linux/Mac OS X via Wine
3.
Run the RUU with your phone
plugged in to your computer via its USB cable.
4.
Follow the RUU's instructions for
flashing.
5.
Unless errors arise your device
is now flashed.
App
Installs/ROM Feature Installs via Flashing
Some ROMs have added
features that are available to flash.
1.
To Flash the App/Rom Feature you
must first download the .zip file.
2.
Mount your devices SD card and
copy the .zip file over.
3.
Boot up to your devices custom
recovery.
4.
Wipe your Dalvik-Cache in the
Wipe Menu. And then go back to the recovery's main menu.
5.
This step may vary per device,
there should be an option that says "Flash .zip from SD Card", select
it.
6.
Select the .zip file you wish to
flash.
7.
Confirm flashing of .zip file.
8.
Wait for the file to flash; and
if successful, reboot.
Android Flashing Guide (with fastboot)
Prerequisites
To Flash a ROM for your
Android device with fastboot you must have an unlocked bootloader or an
engineering bootloader, these can be found across the internet. Supported
devices are listed below:
1.
Android Dev Phone 1
2.
Google I/O Device
3.
Nexus One
4.
Nexus S
Unlocking your
bootloader
The ADP1 and Google
I/O Device do not require unlocking, however the new Nexus Devices do.
1. Nexus One (cannot be
relocked).
1. fastbootoem unlock
2. Accept/Decline
warning on your devices screen.
2. Nexus S (can be
unlocked and relocked).
1. fastbootoem unlock
2. Accept/Decline
warning on your devices screen.
3. To relock the
bootloader issue the following command:
4. fastbootoem lock
ROM Flashing
1. Obtain a ROM of your
choice, and note the location on your computer.
2. reboot your device
into fastboot mode via one of the following options.
1. adb reboot bootloader
(requires USB debugging to be turned on).
2. power off the device
then back on with 'vol up' + power button.
3. Wipe your device.
1. fastboot -w
4. Update your ROM.
1. fastboot update
</path/to/your/RomFile.zip>
5. Your phone will
update and automatically reboot into the new ROM.
ROM update without
SDcard
If you don't have an
sd card, or your slot is broken you can try this trick, but you will need a
custom recovery like Clockwork.
1. Boot up your phone to
recovery. And move your rom file to the adb directory, and start a command line
( cmd )
2. adb shell
3. mount data
4. Ctrl+C
5. adb push
D:\custom_rom.zip /data/
6. Wait until the push
finised, and restart your device to recovery again with "adb
reboot-bootloader"
7. mount data
8. mount /data /sdcard (
mount the data folder into your sdcard folder, so your recovery will think that
you have an sdcard installed )
9. Locate the ROM .Zip
file you wish to flash.
10. Confirm the flash by
following the on-screen instructions (ie: pressing the trackball, pressing the
call button, etc.)
11. If no errors arise
during the flashing process then the ROM flash was successful, Reboot the
device.
12. With some root file
explorer, remove the rom file if you don't need it anymore, to free up space.
13. Or use adb to remove
the custom recovery
adb shell rm
data/custom_rom.zip
original author: techgage


0 comments:
Post a Comment
feel free to post your comments! Don't Spam here!